Search
  • Home
  • Blog
  • Recipes
  • Events
    • TIBS Family Dinners
  • About
  • Contact
Close
Menu
Search
Close
  • Home
  • Blog
  • Recipes
  • Events
    • TIBS Family Dinners
  • About
  • Contact
Menu

Feisty Chef

Chef, Mother, Crazy Cheese Lover

May 31, 2010

The Grilled Pizza Epiphany

by Renee Lavallee in Everyday, Recipes


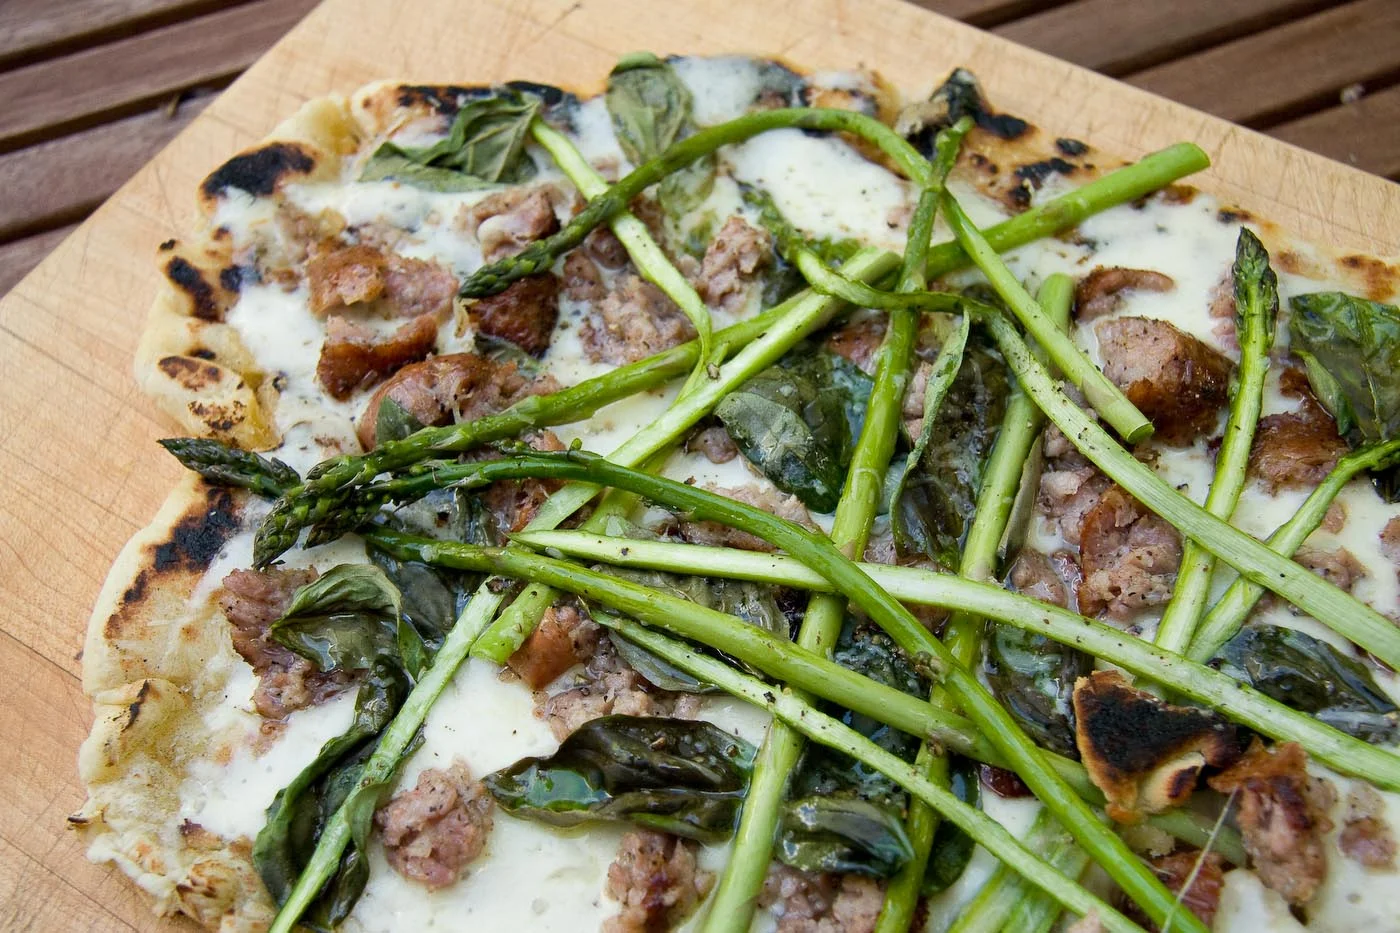
While scanning Twitter the other day, I came across a tweet by Smitten Kitchen about a "Shaved Asparagus Pizza". Having just purchased 2lbs of fresh asparagus at the market that morning, and wanting to try out my pizza stone on our Weber grill, I decided to take the Smitten Kitchen recipe and use it as guideline.

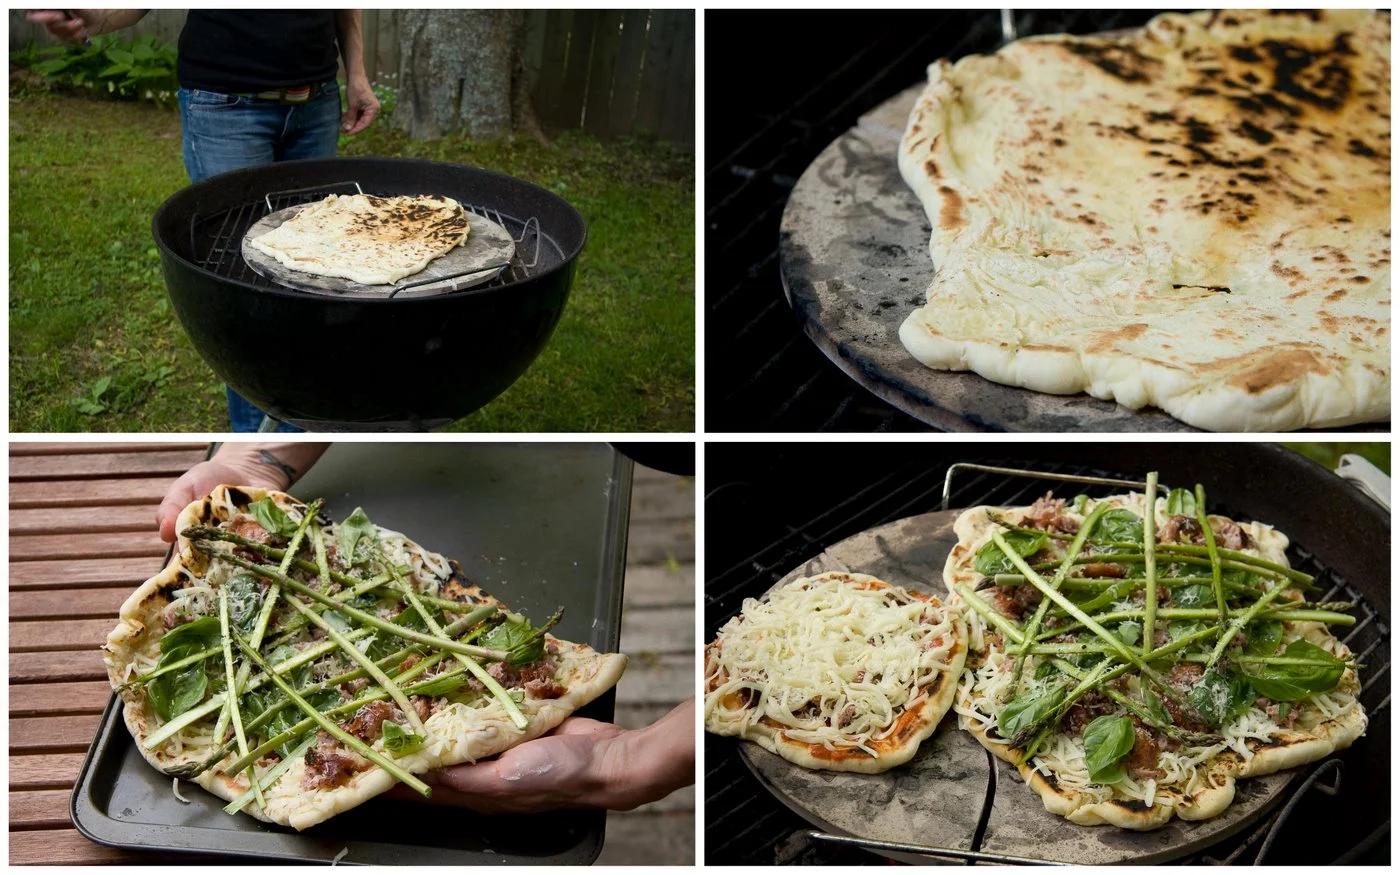
First, I made a quick and easy pizza dough in my mixer and let it rise (see recipe below). Next came the building of the fire. Using a charcoal grill always requires some planning ahead and some carefully honed fire making skills! FYI....my fire making skills are outstanding! As my grill started to heat up, I put my stone on the grill and allowed it come up to temperature. This gave me a chance to prep the rest of my ingredients. A little shaved parmigiano-reggiano, mozzarella, some beautiful local asparagus from Caribou Island, basil from Riverview Herbs and a few crumbled sausages from Sweet Williams (grilled in advance) rounded out our 'za toppings for the night.

After I rolled out my dough, I placed it on the white hot stone. I let it cook for 2 minutes then flipped it over and gave it another minute on the other side. Once this was done, I liberally drizzled my half cooked dough with extra virgin olive oil and then layered on the rest of the toppings. I returned the dressed pizza back to the stone, placed the cover on the grill and let 'er cook for another 4-5 minutes.

The result was nothing less than incredible. It was one of the best pizzas that I've ever had! No joke! The crust was tender and crunchy, the toppings were warmed through, yet retained their freshness and the whole pizza had a delightful smokiness from the charcoal.   I suggest that if you own a pizza stone, throw it on the grill this summer and experiment with some different toppings - both savory and sweet. I cannot wait to to try this again!

Basic Pizza Dough

  • 3 ¼ C. AP flour
  • 1 Tbsp salt
  • 1Tbsp sugar
  • 2 tsp instant yeast
  • 1 ¼ C. warm water
  • 2 Tbsp. olive oil

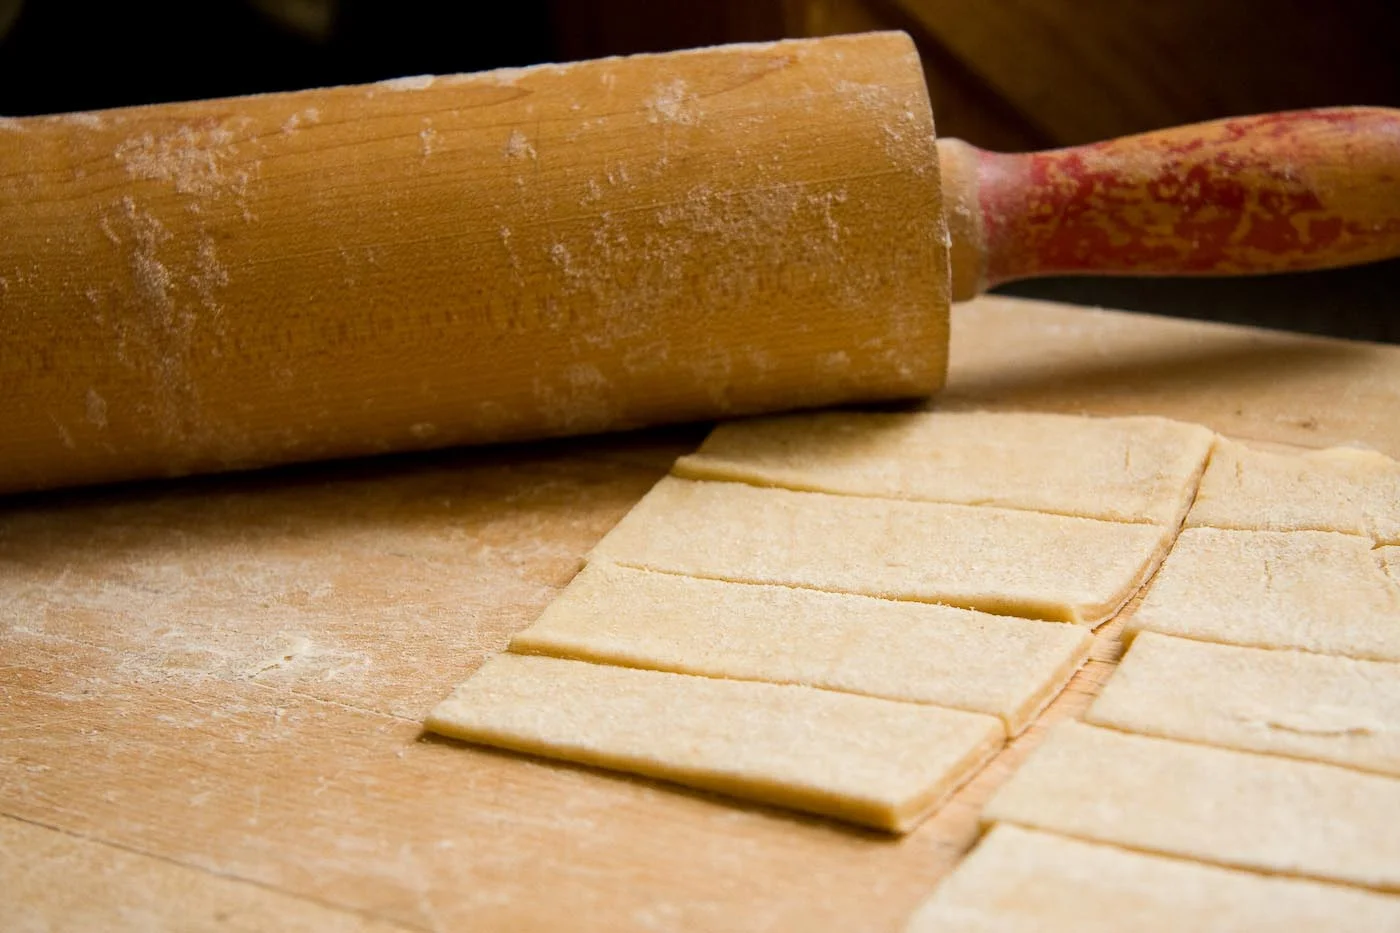
Place the dry ingredients in a stand up mixer with the hook attachment. Add wet ingredients and mix until the dough comes away from the sides and is elastic and smooth (about 5 minutes). Cover with plastic wrap and put in warm place to rise for 1 hour. Once the dough has had a chance to rise, roll it out to any size or shape that you desire.

1 Comment

TAGS: Riverview Herbs, Sweet Williams, pizza, bbq


May 27, 2010

It'll Make You "Crackers"

by Renee Lavallee in Everyday, Recipes, Favorites


In case you haven't heard, I have a soft spot for cheese and crackers. Nothing major, but if you ask my better half, he'll attest to the fact that often enough, my meal of the day will consist only of cheddar cheese and some crackers. Now, I know that this sounds pretty pathetic, but the beauty part of it is that I make my own crackers. Yep, that's right, I make my own crackers to enjoy with my cheese. It might sound daunting to some, but this recipe couldn't be easier. I put all my ingredients in my food processor and then roll it out with my Grandmere's rolling pin (a very treasured Granger family heirloom that has been passed down through many generations). I hope that the next time you decide to indulge in some cheese eating, or even a bowl of tomato soup that deserves a trusty companion, you'll muster up the time to cook off a batch of these bad boys.

Easy Peasy Crackers

  • 3C. all pupose flour
  • 2 tsp baking powder
  • 2 tsp salt
  • 1/2 C. cold butter; cubbed
  • 1C. sour cream
  • 2 eggs

Pulse the flour, baking powder, salt and butter in food processor until it becomes a coarse meal. Add in wet ingredients and quickly pulse until the dough comes together. On a floured work surface, roll out the dough until desired thickness and cut into any shape (I like long, narrow triangles).Place on a parchment lined baking sheet and cook in a 350 oven for about 20 minutes.

1 Comment

TAGS: crackers, cheese


May 25, 2010

It was a meal fit for our new king!

by Renee Lavallee in Everyday, Recipes


By now most of you know that every Saturday morning, Doug & I round up Zoe, and now Philippe, before heading out to the Farmers' Market to grab our supplies for the week. On this particular Saturday, seeing as it was Philly Boy's first ever trip, we decided that we would splurge and grab more than usual, then go back to the Darkside and cook ourselves a feast to celebrate. Our supplies included mussels from Indian Point, Stutz hard apple cider, bacon from Sweet Williams, greens, radishes & rhubarb from Hutten Family Farm and of course, bread from La Vendeenne!

Into the kitchen we went; Philly in the Baby Bjorn & Zoe anxiously circling our legs. The mussels got a quick clean before they were added to my Creuset. The pot contained garlic, bacon and tomatoes that I had already cooked down slightly. A quick stir and in went a few bay leaves and two bottles of the Stutz cider. Cover on, and we let them steam while a simple salad was made. A gorgeous bag of greens from Ted Hutten got mixed with some sliced pear & candy cane beets, shaved extra old Growler from That Dutchman's Farm, and a sprinkling of toasted pine nuts. Honey, champagne vinegar and olive oil made up a simple vinaigrette, and we were off to the races! Out came our Parisian loaf from La Vendéenne, ready to sop up the juices from the mussels. The whole meal was topped off with a rhubarb crisp (recipe coming soon) and a scoop of Fox Hill gelato.  This was a feast fit for our new "king"! Too bad Philippe couldn't enjoy any of it, but the rest of us surely did!

My Cider Mussels

  • 5 lbs mussels; cleaned
  • 4 garlic cloves; sliced
  • 2 whole tomatoes; roughly chopped
  • 1/2 lbs bacon; roughly chopped
  • Butter
  • 3 bay leaves
  • 2 bottles hard apple cider (I like Tideview or Stutz!)
  • Salt & pepper

In a large pot, heat butter and add the garlic and cook for 30 seconds. Next, add the chopped bacon and cook for another 4 minutes. Add the tomatoes and cook down for 2 minutes. Add the mussels and bay leaves and give a good stir (or shake with lid tightly on). Pour in the cider, cover and cook until all the mussels open. Season to taste. Remember folks, if the mussel stays shut, do not eat it! Enjoy!

Comment

TAGS: Hutten Family Farms, Sweet Williams, Halifax Farmers Market, Indian Point Mussels, Fox Hill Cheese, Boulangerie La Vendeenne


May 17, 2010

La Petite Gourmande

by Renee Lavallee in Everyday


I once had a co-worker at Les Fougères, who had a four year old boy. He told me a story one day about his son that made me laugh. After hearing this story I hoped that if I ever had kids, mine would do the same. He explained that his family had been invited over to a friend's place for dinner and that when the main course of pasta came out, his son took one bite, pushed his plate away, turned to the host and said "Your pasta lacks seasoning. I refuse to eat this until the proper amount of salt and pepper is added." I laughed so hard, and poor Mario was embarrassed by this event, but nonetheless, he was proud that his boy was a "gourmand".

Along came a "petite gourmande" of my own. My daughter Zoé is all of 19 months, and has been eating solid food for more than a year. Her first foray was like every other baby; bananas, pears, prunes and sweet potatoes, but now and then I'd throw her a curve ball to see how should would react. An asparagus and fiddlehead soup was her first favorite, followed closely by pasta with Taleggio cheese, sundried tomatoes and basil. Yay, my babe was developing a palate more discerning than some adults!

Of course, this wasn't always true. I have seen a bowl flung against my pale yellow walls after some hard core head shaking. To this day she refuses to eat mango, yet plonk and avocado on her plate and it's gone within seconds. Cheese is already a major force in her young life; Taleggio is a winner, as is Manchego and Chèvre. I once gave her a dreaded processed cheese slice only to find it stuck suspiciously under her high chair. A few days ago, Zoé decided that the foie gras mousse, that Doug brought back from La Ferme Basque in Quebec, was best served with a sippy cup of local apple cider, and that Serrano ham worked wonders with some steamed asparagus and a side of pears. Saturday mornings are sacred for my family and a definite favourite for Zoé. This is when we make our weekly trip to the Halifax Farmers' Market. Zoé always opts for a croissant from La Vendéenne and a scoop of gelato from Fox Hill Cheese House. Believe me, this kid knows what she wants!

I had always hoped that my child would to try different things, and give "peas" a chance. Now I can only hope that her brand new baby brother, Philippe, chooses the same path!

1 Comment

TAGS: Taleggio, cheese, Fox Hill Cheese, Boulangerie La Vendeenne, Les Fougeres


February 23, 2010

The Key to the Pie

by Renee Lavallee in Everyday, Recipes, Favorites


I recently returned form a trip down to southern Florida and decided that after watching many episodes of "Dexter", that I too, needed to find the perfect Key Lime Pie! After many tastings and many disappointments, I decided to take the task into my own hands and attempt to make my own. Here is the recipe for the Key Lime Pie that worked best for me and that I ended up falling madly in love with.

The Perfect Key Lime Pie

Crust

  • 1 1/4 C graham cracker crumbs
  • 2 tbsp sugar
  • 5 tbsp melted butter

Filling

  • 4 egg yolks
  • 1 can sweetened condensed milk (300ml can)
  • 3/4 C Key Lime Juice (about 20 limes)

A trick to getting the most juice out of these little guys is to either roll them for a few seconds until they soften or pop them into the microwave for a few seconds.

In a pre-heated 350 oven, press the crust mixture into a pie pan and bake for 10 minutes. Let cool before adding the filling.

Whisk the eggs and condensed milk together. Add the lime juice and mix until incorporated. Pour into prepared pie shell. I leave you the option to bake or to not bake...difference is that if you choose not to bake it, I find the lime flavour comes out a lot more (you just need to chill for 3-4 hours). Baking it at 350F for 15 minutes cooks off the egg and mellows out the flavour. Your choice!

I chose to bake mine this time around (due to my pregnancy); they came out looking mighty fine.

I like to cool any baked goods on a wire rack; the air circulation helps the items cool down at an even and faster rate. Some people garnish their pie with either meringue or whipped cream and a slice of lime. I, as a purist, prefer plain 'ol pie.

4 Comments

TAGS: Key Lime Pie, dessert


February 3, 2010

Hot 'n' Sour

by Renee Lavallee in Everyday, Favorites, Recipes


Lately these  days I have been feeling the need to overly indulge in spicy and sour food; could it be the fact that I have a massive baby in my belly? Maybe? But because of this, I have been making hot and sour soup like it is going out of style at my place. As I explained to my sous chef, Severine, the other night, it takes a few minutes to make and is extremely satisfying! So, Severine Hansen, if you're reading this, I expect to hear that you've made a batch for your fiance!

Soup Base

  • 1 1" piece of ginger; coarsley chopped
  • 1 stalk of lemongrass; coarsley chopped
  • stalks from a bunch of coriander
  • 6 lime leaves
  • 1 lime; juiced
  • 1L chicken stock
  • 1 tbsp Sambal Olek
  • 1/4 cup fish sauce

I sautee the lemongrass and ginger together until fragrant; then I add my coriander stalks and lime leaves. Then I add my lime juice, fish sauce, stock and sambal and let simmer for 10 minutes. Once it has simmered for 10 minutes, I strain the whole lot and put the broth back into the pot.

Soup Ingredients

  • 1 dozen shrimp (I use 16/20 that are peeled, de-veined and cleaned)
  • 1/2 block firm tofu; diced
  • 1 tomato; coarsley chopped
  • 1/4 pineapple; diced
  • 12 button mushrooms; quartered
  • 1/2 cup chopped coriander leaves

I bring all this to a boil and cook until the shrimp are cooked. I also season with more sambal if needed.

Depending my mood, I also  add rice noodles or rice stick noodles. If I use rice stick, I soak them for 10 minutes in warm water then add to the strained broth and cook with the rest of the ingredients. If I use rice noodles, I just add them and they only take a minute to cook!

2 Comments

December 13, 2009

Get Your Udon On!

by Renee Lavallee in Everyday, Favorites, Tips


About ten years ago, I was invited to my sister-in-laws' parents house for a traditional Japanese meal. There in the kitchen were several generations of Taira women cooking up a storm! Udon, tempura, gyoza, teriyaki & sushi all being prepared while these women talked and gossiped. It was amazing to see them work together, rhythmically, without any communication about what was going on around them. Peggy had the udon on the go, Toyo was frying up some tempura and Aunt Lil was gossiping about the recent trip to the casino while rolling sushi. I was in culinary heaven! It was then and there that they beckoned me into this kitchen and asked me if I knew what they were doing. My response was vague, telling them that I had eaten and seen most of these things, but had never cooked them myself. Peggy and Toyo simply giggled and Aunt Lil pulled me by the arm and took me over to the stove to explain to me how the udon was made. What an education these three women gave me, and have continued to give me for years after. So, it probably  comes as no big surprise that I keep a secret stash of Japanese ingredients on hand at all times; bonito flakes, kombu, nori, tofu, wakame, edamame - you get the picture.

On a recent Sunday morning, when the thought of bacon and eggs was not even an option, I pulled out my big green Creuset and proceeded to make a big batch of udon for Doug, Zoe and I to enjoy. On this day, I made my dashi broth by cooking the kombu in water with the bonito flakes and some tamari (click here for a simple dashi recipe). While letting it cool, I cooked off my udon noodles and strained the stock. I was lucky enough to have a few fresh scallops leftover in the fridge, as well as some lobster meat - both perfect additions to the soup. I added in some shitake mushrooms, tofu, edamame and spinach and had myself a pretty amazing udon!

The great thing about udon is that you can basically add anything to it and it always tastes great! I suggest that on some blustery day, when you don't know what to cook, have a go at making your own udon and see what combination works for you!

1 Comment

TAGS: scallops, kombu, japanese food, udon, dashi, seafood


  • Newer
  • Older

COPYRIGHT © 2015 FEISTY CHEF